8 Equipment and Tools
8.1 Army Toolkit & CES
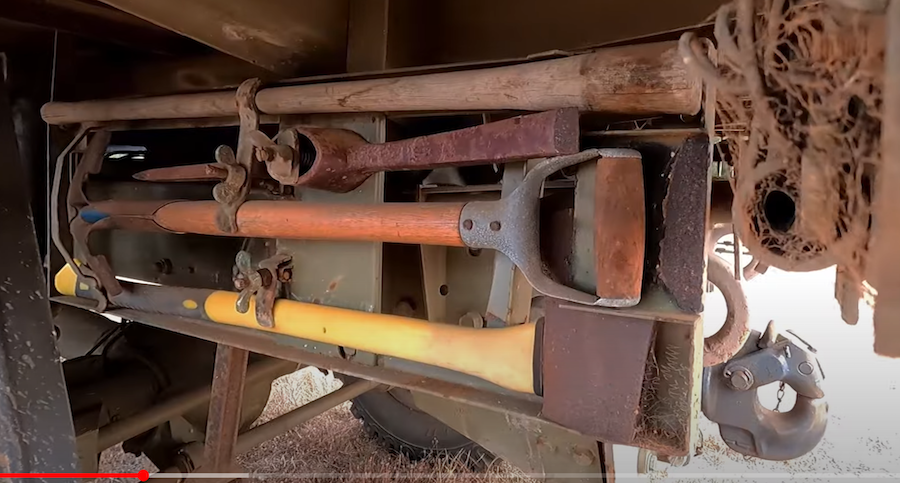
The toolkit that the army put under the MOG consisted of:
| # | Item Description | Item Location |
|---|---|---|
| Item 1 | Pick with Handle | Separated, the handle at the top of the holder, with the Pick head located underneath |
| Item 2 | Combination Spade & Shovel | In the middle of the holder |
| Item 3 | Axe with handle | In the bottom of the holder |
The tools under the rear of the Unimog as shown in video: Pat and Jele YouTube 'Moggy' Tour 1:09 I.e axe, shovel, pick axe. Now I am confident that these tools were Australian supplied, but I have not been able to find replacements. I did go to Bunnings to check out if they had products that would fit. Cyclone tools appear to be the most likely candidates, but I did not find anything in their range of axes that would fit into the CES tool rack under the Mog. Their 2kg polished axe is too large, and their all-steel half axe too small. Similarly, Cylone have a 'Digging & Shifting Shovel' that is about the right length, and one of their few products with the dee grip and short length. Unfortunately it does not fit either.
"CES" Complete Equipment Schedule
As you read through the documentation that the DoD provided for the Mogs, you will come across the term 'CES'. I for one could not find out what this meant until Trevor Boyd helped me out by providing a PDF version of some pages. The PDF is now hosted within the files of the OZMOG facebook page: ADF Unimog Complete Equipment Schedule inventory Upload.pdf
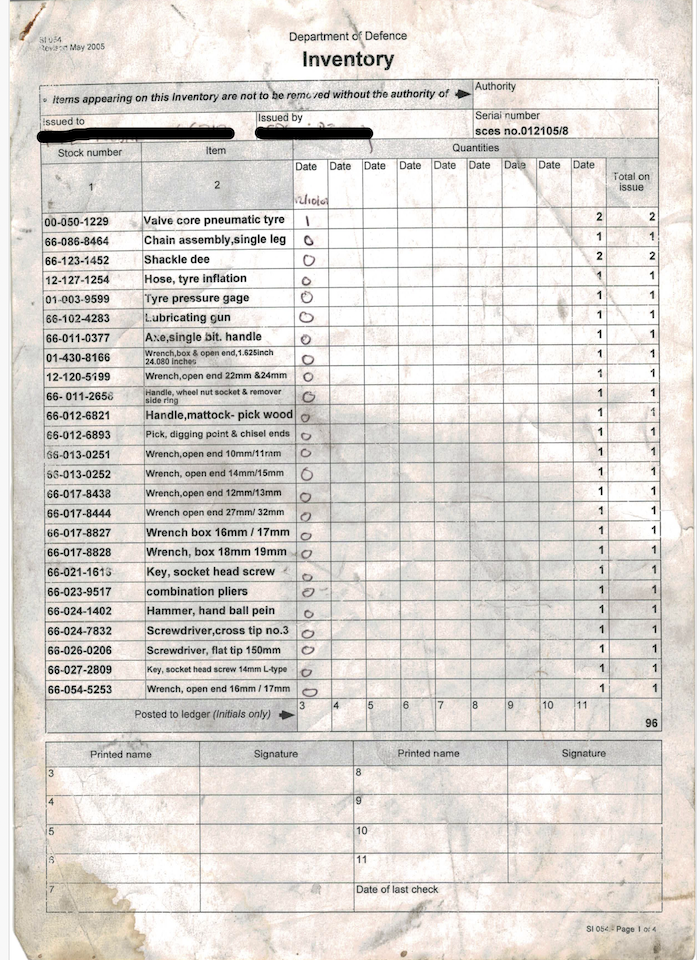
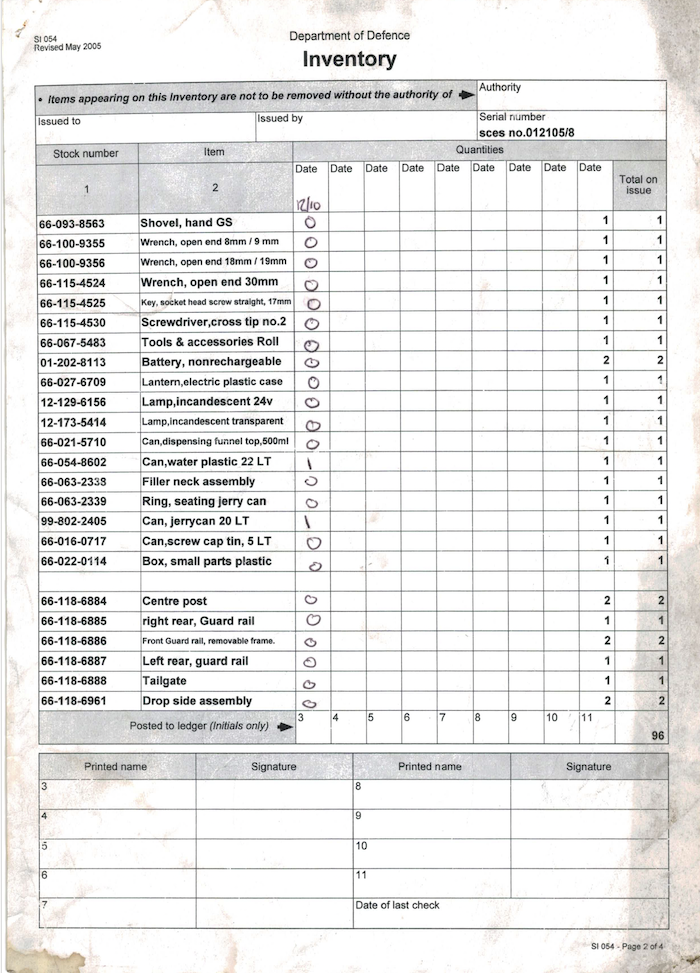
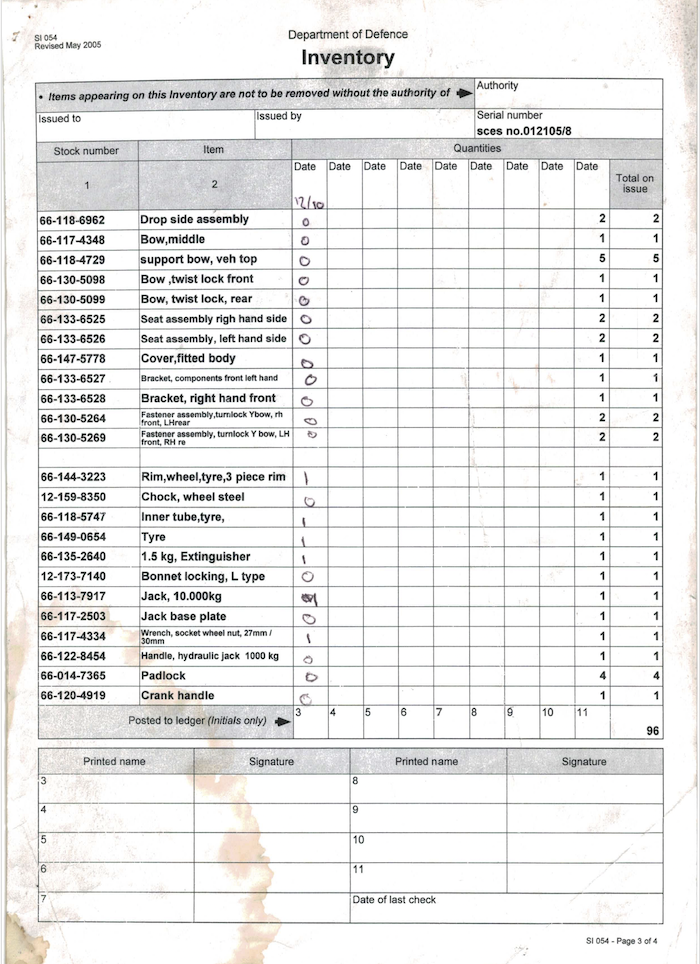
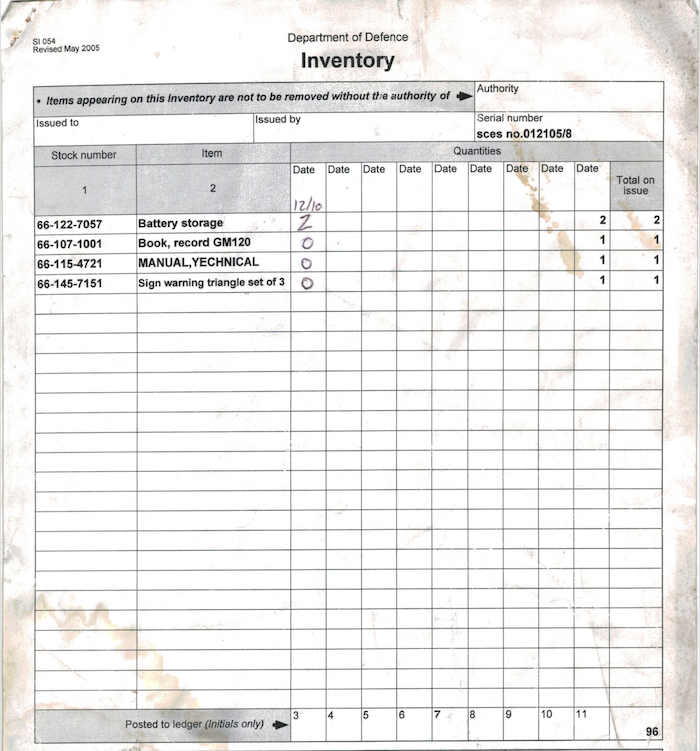
Now if you want to create your own list of tools / ensure you have what the army recommended was carried, I have produced two Microsoft word documents that might be useful. (Note: these are downloads). The first is simply a copy of the above PDF. Army Unimog CES List. The second is my version of the Army document, augmented by products that I find useful, or that other Mog owners have recommended. Expanded Army Unimog CES List.
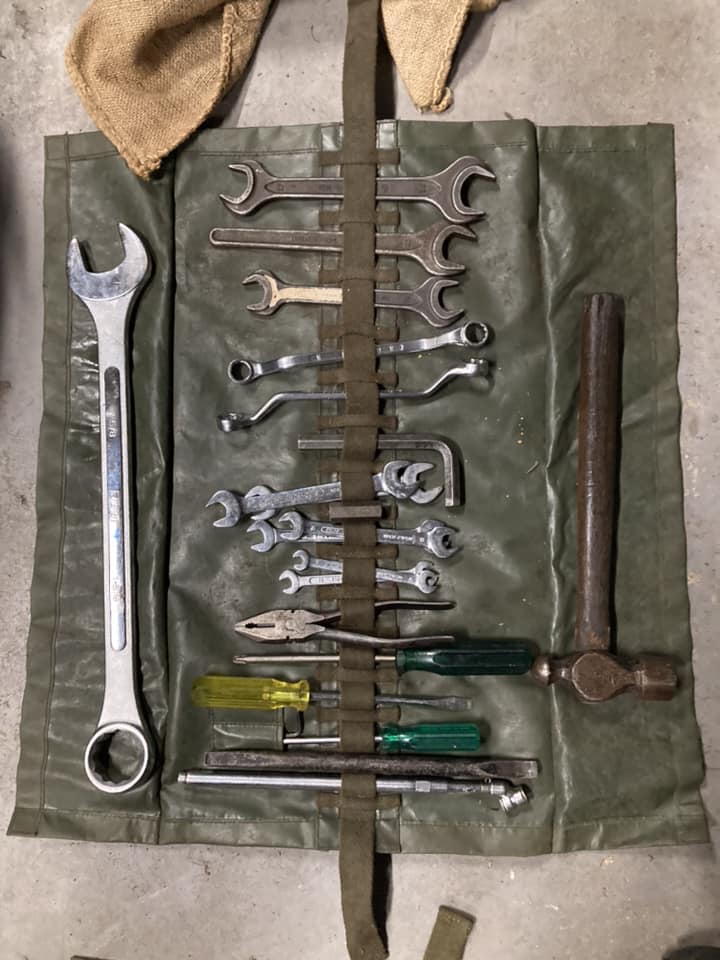
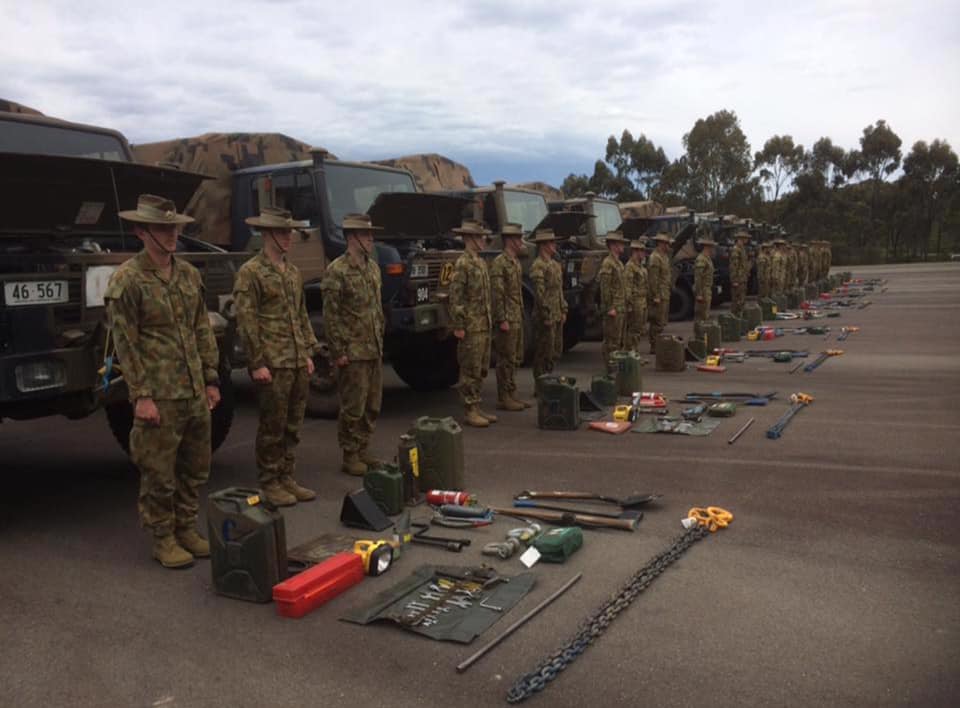 Staff Inspection of CES
8.2 Universal tool
The Mercedes "Universal Tool" is a simple piece of steel rod, bent 90 0 in the middle. On one end it has a square socket, and the other end is square. This normally lives in the drivers side door pocket clipped to two small plastic lugs. The Universal tool is used to open the bonnet, remove the bonnet, and open the battery box. I have not found other uses for it. These are cheap to buy if lost, and, in a pinch, I am sure other tools would perform the role. This is an important tool for servicing the Mog.
8.3 Torque Wrench
The TW needs to go up to 750NM. I have a typical 3/8 Torque Wrench, and I have a ½ Ryobi impact driver that can hit 450Nm. – but I have nothing high enough for the Unimog and in particular for its wheel nuts. Total Tools have this Warren & Brown 3/4 inch 150-750nm one for $539 (2024-11-19). I have not found cheaper ones that can do the 450+NM. This thing also looks long enough that you don't need to be superman to use it.
8.4 Socket Kit
I already have a great Stanley 3/8 spanner / socket kit, but this wont handle Unimog sizes. I got a Kingchrome cheap ½ socket set that covers the big sizes, but with no spanners. I am probably going to have to use adjustable spanners when I get beyond 30mm.
8.5 Spanner Kit
I already have a great Stanley spanner - 3/8” socket kit, and simple (cheap) kit of ratchet spanners. These kits are great. You may only use a few of the items, but everything is together and held in place.
For the Mog though, I needed a 3/4" drive set of sockets - not 3mm sockets - but the big 20-30mm ones.
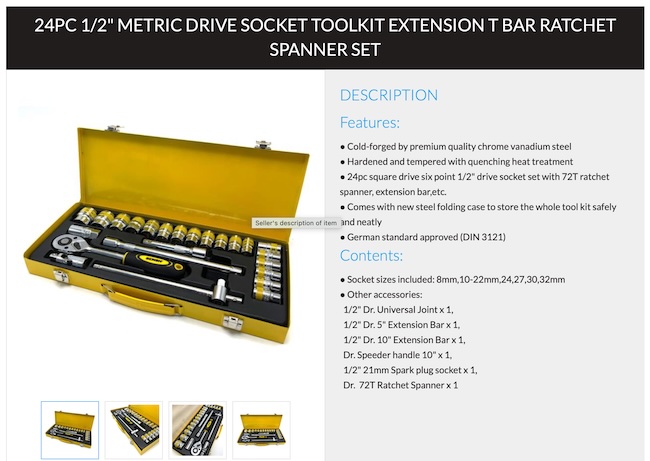
I got the above socket set - including 8mm, 10-22mm, 24, 27, 30 and 32mm sockets, for $55. I am confident that it is not high quality, but I also think that it will do for while. I really needed the 24-32mm sockets.
8.6 Crimping kit
I am doing my own wiring, in the sense that I am designing it, measuring it, and installing it. If I am cutting the wires to length, then i need to have a crimping tool. The multiple batteries, winches, invertors, dc-dc, fridges, etc. mean a reasonable amount of heavy current cables, that will need good sized crimps and crimping tools. Various people on the Ozmog forum indicated that a hydraylic crimping tool is the only way to go. I got a 16ton one on ebay for $70 that comes with 20 dies.
8.7 Nutsert Tool
The interior panel on the Mog is kept in place with plastic trim pins. These work, but they tend to break when you try and take them off, and there is a bewildering array of various pins on the market - so finding the right replacements is not easy. Nutserts, or Rivnuts, are nuts that are popped into a panel like a pop rivet. They leave a nut in the thin panel, and this lets you bolt things to the panel. Bunnings and I assume other stores like SuperCheap, Repco and Autobarn, have the nuts available for 50 cents each, and the tools for around $80-$200. I brought my tool kit on ebay. Note that, as panels are thin, it is not likely that you will bolt a M24 bolt to the panel. It is small sizes like M3-M10 that are most useful.
8.8 Cabin Tilt
Sooner or later you are going to need to tilt the cabin either to get to the engine, or to get to the bottom of the cabin (for painting etc.). The ADF had a boxed cabin tilt kit available at their workshops, and these occasionally become available for sale second hand.
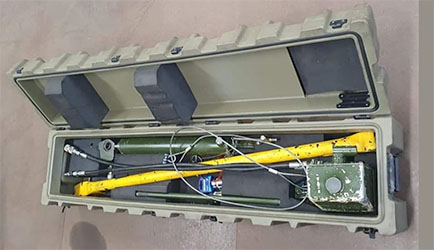
Most people have had to make their own Cabin Tilt kit by modifying a standard (but long) hydraulic jack. Jason Firmstone's Dare to Dream website provides a wealth of information on how he did his, including a range of photos.
Pate and Jele Tilted Cab is an episode of their YouTube series. At Minute 13:45 they show where the tilt mechanism is installed; at Minute 14:35 they begin prepping to tilt; and at Minute 15:00 they do the tilt. They simply use a forklift instead of a hydraulic ram. At Minute 21:00 they manufacture a stay for the cabin, but this one goes in where most people would put their hydraulic lifting ram.
Jocke Selin's Unimog Camper E020 - Tilting the cab and propping it up provides another video of someone tilting the cabin. In this case he shows a lot of details about the prep work. At minute 7:10 he installs his cab tilt mechanism. His mechanism appears to consist of two machine bolts. At minute 11:21 he installs temporary cab supports and manufactures his two cab stays.
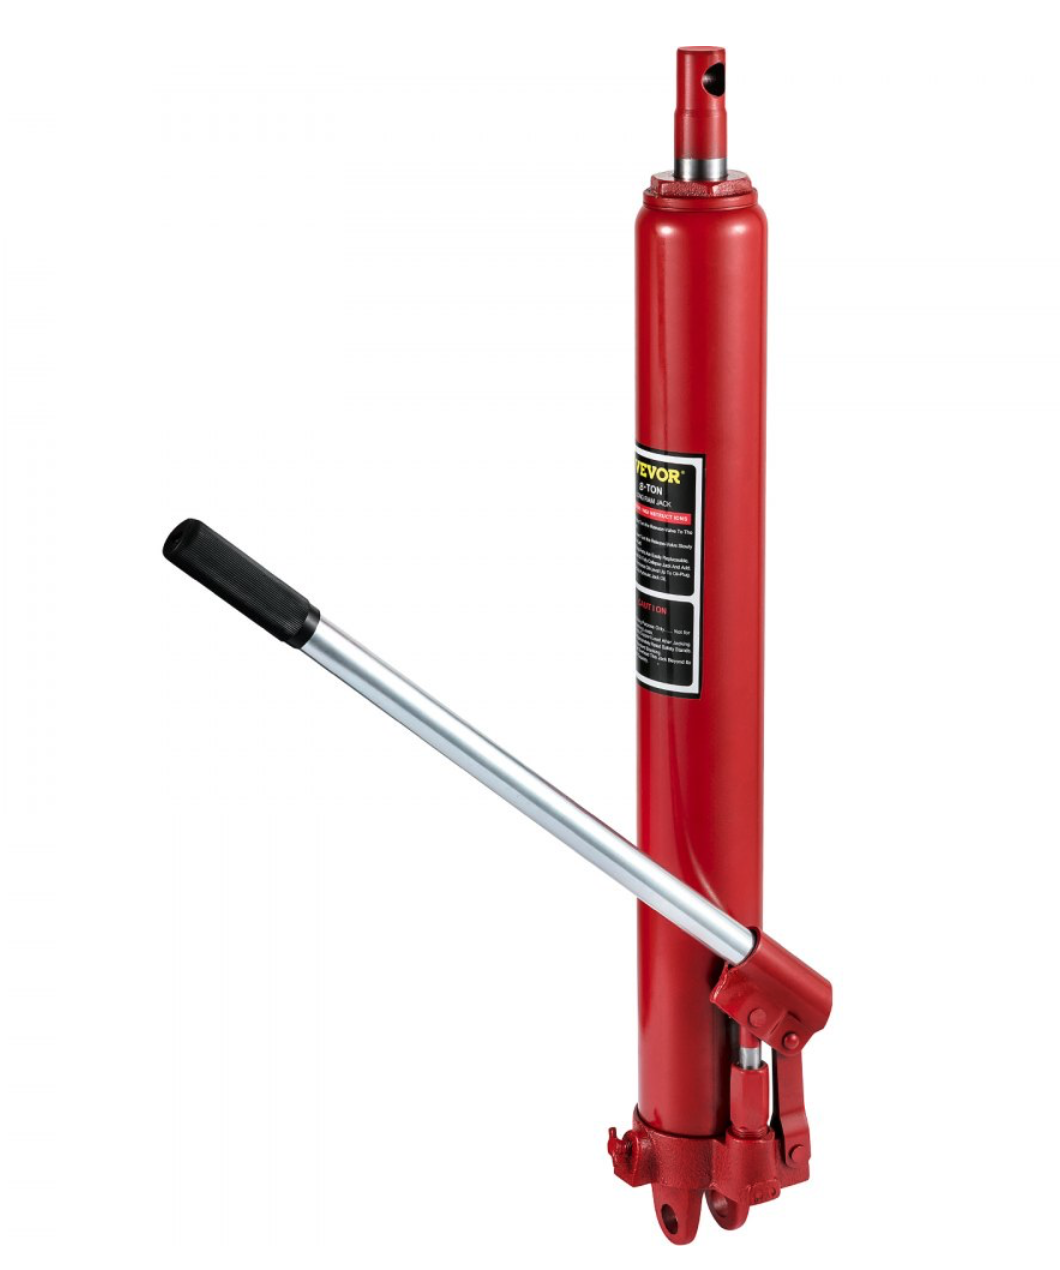
Paul Allwood indicated that: "Retracted length C-C between mounts is 590 mm. Extended is 1080 mm." Nick Barratt found a Vevor 8 tonne engine lift that he intended to modify. The unit is $73 (20240925) with free postage. Minimum height 66cm, and maximum 116cm. The extension of 50cm is perfect, but the attachments would need to reduce the length by some 7cm.
8.8.1 Cabin Stay
Regardless of how you tilt the cabin, for safety sake, you need to put in a stay to ensure it stays tilted. This is the yellow rod that you can see in the ADF kit above. I have not seen details online on how to make one. I have also not had the chance to see one to get measurements etc. so I can make one. (Note: I don't like making safety related items - but I would prefer to make one than to not have one.) The only ones I have seen for sale online were scams.
8.9 Electrical kit
8.10 Toolboxes
Siemens have a free 2d drafting tool called solid edge. It has been used before to create underbody toolkits. https://www.youtube.com/watch?v=W_8dlNnxyhI He then used a sheetmetal modelling tool “runshape” – sheet metal modelling.
8.10.1 Under tray boxes
I want to put more tool boxes under the tray. These will carry the emergency kit – towing / recovery gear. T.C.Boxes has the sort of thing available for $449 (extracted 2024-09-01). Total Tools also has options. I need to find out the right size needed, and I will need to replace the rear lights to suit. One thing is that the passenger side one of these would cover over the Army toolkit. I notice that most of these also have 'flat tops' to the boxes, but the underneath of the Mog is definitely not flat. Some thought would need to go into how to mount these.
8.10.2 On top of tray box
I also need to have a box in the back of the Unimog that can retain all our gear. This needs to be designed / constructed. Effectively a tall tradie box. It needs to be the width of the tray (internally), attach to the deck (bolted / secured), be sturdy to cover the movement of the tray, up to around 160mm high (quite high) and a depth that will allow the batteries, front runner boxes and canvas bags to all go in ok. This tray will have the batteries on its bottom shelf, connectivity to the existing 24v, switches, relays,etc..
8.10.3 Rear deck
The base (army) rear deck is marine ply. ‘Adventures of the Downward Dog’ used 10mm steel. There were lots of comments on QT-80 in 6mm, or QT-400 or Hardox 450 in 5mm being more resilient and lighter. It seems the existing deck is 19mm 6-ply marine ply. That seems good enough for me. It might be worth some sort of lining on the deck like rubber mat. I could put down Raptor or another 'tray liner' product, but these seem better suited to steel decking, and not to the sacrificial marine ply.
The key issue is getting the old ply out, getting the right bolts (someone called them decking bolts – never heard of that, but they are not coach bolts either), and then putting in new decking. I did find "CSK bolts" (Countersunk Flat Socket Cap Bolts). These appear to be the right thing. Countersunk to go into the ply, flat top to not poke up from the deck, long enough to go through the 19mm deck + whatever is getting bolted on, Allen key tops, and bolts not screws. My 'go-to' store for fasteners is 'fastenersgalore1' on ebay. They are based in Brisbane, and have products to me here in Melbourne after 2-3 days. They have a pack of 100 zinc plated countersunk M10 X 70mm for $69 (20240924) with free postage. This would handle attaching items up to around 40mm thick under the tray. Also M10 X 45mm, pack 100 for $42 (20240924) which would handle items up to around 15mm thick. I will be making up steel brackets for a few items, probably out of 6mm steel, so these M10 X 45mm bolts look ideal.
8.11 Air line tool
The Mog operates off air. Air brakes, air park brakes, air to change gear sets, air to everywhere for fording rivers, etc. Air lines are an important part of any service or repair kit. The air line tool helps in pushing the air lines onto their post. The air lines should not be heated. Facebook User Stuart Bucket found the following item: Amazon Air Tubing Pipe Grips for $115. I found the same product available on Ebay for $163 and up to $190 elsewhere on the internet. A tool that looks better quality, and states:"This tool is used to install the plastic line on to barbed fittings found in numerous applications all over the UNIMOG. Comes with two interchangeable heads and may be used with the seven most common line sizes. Original Mercedes-Benz tool." is available Air line installation tool but at $945.44 (20241006) is a bit rich for me.
8.12 Welder
I really want a welder that can operate on 240V, 10 A source, but also do AC/DC Mig / Tig. Unimig welders seem to be the one. Several options, but 180 / 185 at the smaller end (no AC), and 200 having AC/DC but also a 15A draw. Need an adjustable helmet, gloves, etc. Purchased a Lincoln 200m multi process 4 in 1 welder – stick, mig, dc & ac tig. I have used it on some thin steel, and it did a better job than me. I just need practice, and a lot of grinding wheels :-)
8.13 Tyre Repair Kit
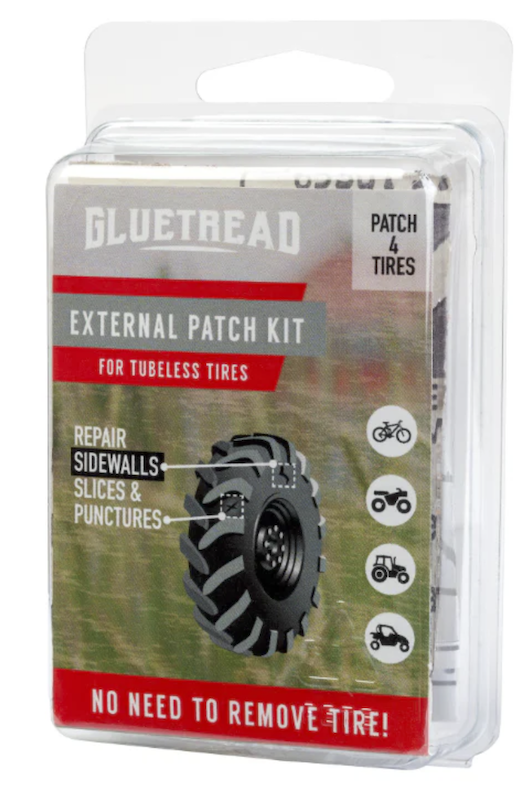
Most 4x4 / outdoors shops sell tyre repair kits for tyre treads. This generally consist of: a reamer for cleaning out the hole, some glue, several plugs for putting into the hole, and a insertion tool. These kits are known for being fairly successful at fixing holes in the tread, and for being cheap insurance. However, it is illegal to repair tyre sidewalls due to the risk of repair blowing out at speed, and these kits do not contain 'patches' in addition to plugs. Gluetread Australia are an Australian reseller of Gluetread US, who provide sidewall repair kits. While still not legal for use on roads, repairing a sidewall in the outback is much much easier, much lower cost, and means that a vehicle that might have needed a low loader transport out can get to town under their own steam. I consider these invaluable. I purchased their External patch kit ($23.06 20250521), and their Tractor Kit ($79.00 20250521) - which appears to be identical to their 'Full sized' car kit anyhow. This last kit contains:[2] 4" x 4.5" Patch, [2] 3” x 1.5” Patch, [4] Bottles GlueTread Adhesive, [8] Applicator tips, [10] Pieces of sand paper. It does not contain the accelerator though. This means it can repair 4 good sized holes / slits, but it will take an hour before the tyre can be reinflated to 40 psi. I don't know about others, but it would take me more than an hour to replace a tyre, and if remote, I would only be at about 40 psi anyhow. This might only be a temporary solution, but it is (4) good ones. The external patch kit. The External Repair Kit is similar, but it only contains: (2) Patch Dimensions: 3"x1.5"x1/8", (2) Patch Dimensions: 1.5"x1.5"x1/8", (1) Piece of Sandpaper, (1) Bottle of Adhesive, (5) Applicator tips. It is limited to smaller holes, and with only one bottle of adhesive, I doubt you could do four patches over more than a few hours. They have several other kits, including ones with plugs and reamers for holes in the tread.

8.14 Infra-red Thermometer
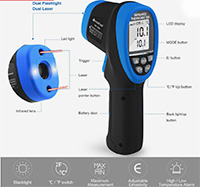
I purchased one off Ebay for $89. Nothing fancy, but certainly does the job. It projects two 'laser' dots that show where it is taking the temperature from. This is very handy as you place these on a hub, disk, tread, pipe, etc. BTMeter Instrument non-contact thermometer